Our stepping stone molds are capable of creating hundreds of concrete stepping stones, if given proper treatment and care.
Preparing your stepping stone mold properly before use is important.
Follow these simple preparation and cleaning instructions and your new mold will have a long and productive lifespan.
Proper mold preparation will also yield the best reproduction of your stepping stone pattern and ensure the mold will maintain its detail for continued use.
GETTING STARTED WITH MOLD RELEASE
We recommend Vaseline® petroleum jelly (or similar) as a mold release.
We tested different commercial mold releases but found that the best results were obtained using ordinary Vaseline® applied with a stiff bristled 1–2 inch wide paintbrush.
Apply just enough to form an even thin film over the entire interior surface of the mold and into all of its detail.
Applying mold release is critical in forming and removing your concrete stepping stone from your mold.
See how to apply mold release.
The paintbrush allows even application of the Vaseline® into all of the mold detail.
Mold release will ensure that the cured stepping stone comes out easily and that the mold is left clean.
If mold release is not used, your mold will end up with concrete residue sticking to the mold detail, and the stepping stone will have poor detail reproduction. Cleaning the mold for re-use will also be difficult.
Check all inside surfaces for an adequate coating before you pour the concrete into the mold.
PREPARING THE LOCATION FOR POURING
Decide where you are going to place your stepping stone molds.
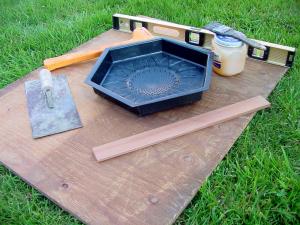
Use a carpenter’s level to locate a level flat surface to pour the concrete into the mold, and allow it to cure.
If needed, use a small scrap of plywood, or any other material that will provide a flat level surface, to position the mold.
We recommend a location close to where you will mix the concrete.
The location should be undisturbed for 36–48 hours allowing the concrete to cure—preferably out of direct sunlight, temperature extremes, or rain.
If your stepping stone mold has detail that prevents it from sitting flat, support it by the edges with some boards or bricks that will hold it up off the detail so that it will sit level while curing.
We have had success placing round stepping stone molds on a large open-topped metal coffee can.
MIXING THE CONCRETE
The easiest way to form your stepping stones is to mix Sakrete™ according to the directions on the back of the bag. This product allows you to mix perfect concrete every time by just adding the proper amount of water.
Mixing in a wheelbarrow, concrete mixer, or just in a bucket, make sure you mix the concrete thoroughly, and for at least 5 minutes. This ensures that the Portland cement has a chance to hydrate completely and form the strongest cure.
Sakrete™ can be purchased in 60 pound, 80 pound, and 90 pound bags. 60 pound bags produce 0.4 cubic feet of concrete. 80 pound bags produce 0.6 cubic feet of concrete. 90 pound bags produce 0.66 cubic feet of concrete.
You can see how many of our different-sized and -shaped stepping stones you can create from each size bag from the table below.
| Sakrete™ | Bag Volume Yield (cu. ft.) |
11-inch Square Stepping Stone Molds |
11-inch Hexagon Stepping Stone Molds |
9-inch Dogbone Stepping Stone Molds |
|---|---|---|---|---|
| CM90—90 pound | 0.66 | 4.7 | 5.6 | 8.1 |
| CM90—80 pound | 0.60 | 4.3 | 5.1 | 7.4 |
| CM60—60 pound | 0.40 | 2.9 | 3.4 | 4.9 |
| CM5000—80 pound | 0.60 | 4.3 | 5.1 | 7.4 |
| FS50—50 pound | 0.33 | 2.4 | 2.8 | 4.1 |
If you are mixing your concrete from scratch you will want to use the following recipe closely.
The aggregate in the recipe should be a sand/gravel concrete mix.
Do not use beach sand or crushed rock as the aggregate.
The components to be used are Type I and Type II Portland cement, aggregate (sand/gravel mix), and clean water.
Mix the components in the following ratios:
10–15% Portland cement
60–75% aggregate (sand/gravel mix)
15–20% Water
- or -
1 part Portland cement
5 parts aggregate (sand/gravel mix)
1/2 part water
First put the aggregate into the mixing container.
Add just enough water to completely wet all surfaces of the aggregate.
Mix thoroughly and then add just enough additional water to show liquid between the aggregate.
Next add the cement, while mixing.
Continue to mix thoroughly and add water a little at a time until the proper amount has been added or the right consistency has been achieved.
The proper consistency is when the concrete has the ability to flow, but will stand to some degree—think of a loose oatmeal consistency.
If the concrete mix is too runny it will make it very weak.
If it is too stiff it will also be crumbly and weak and will be hard to form into the mold detail.
It should flow easily, but tend to stay in a position if pushed and released.
If you plan to mix color into your concrete add the colorant when the mix is dry when using Sakrete™.
Mix the colorant throughout the dry aggregate alone if you are mixing from scratch. Then add the water and Portland cement.
Make a note of how much colorant you use to achieve the color you want and then be consistent with each of the next batches so your stones match.
Concrete colorants can be obtained from your local builders supply or home improvement store.
STEPPING STONE MOLD WORK BOARD

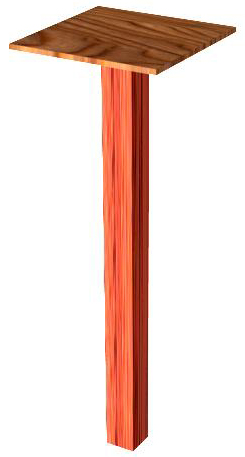
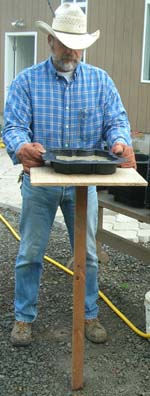
We built our working board in about 30 minutes and it has saved a lot of aches and pains with sore arm and back muscles. It also has proven to help produce stepping stones totally free of voids and air bubbles.
To use this working board we place our mold on the platform and hold the support platform board and mold together on two sides. (See photo, right) Next we have an assistant place the initial amount of concrete into the mold (usually about 1/2 of a shovel scoop).
Then move the mold and support platform together - back and forth, and side to side, rocking it on the post vigorously to agitate the concrete into the detail of the mold.
Let the support platform bear all of the weight as the mold is filled and worked.
We then lift the support platform and mold off of the ground a few times to about 2” to 3” and drop it back down to dislodge any air bubbles off of the bottom of the mold and then continue to agitate the mold back and forth, side to side, and in a circular motion to make sure all detail is filled completely.
We then fill the mold the rest of the way (to within about 1/8" of the top surface) while continuing to move the mold in the same manner.
If the mold is rocked back and forth in this manner you will see small air bubbles begin to appear at the surface of the concrete. We blow gently on the surface of the concrete to pop the tiny air bubbles and continue to agitate the mold for about 1 to 2 minutes, or until the bubbles stop appearing. You probably will never get all the tiny bubbles out, but try to get the bulk of them to rise to the surface.
Then we move the mold off of the platform and to the curing location that has been prepared. It is helpful to have your assistant take care of the work board while the other person moves the filled mold. One legged contraptions rarely stand up long on their own.
FILLING THE STEPPING STONE MOLD

Once the concrete has been mixed, pour enough into the mold to completely fill the bottom and fill all of the stepping stone mold bottom surface detail. We recommend pouring about 1/2” to 3/4” for the initial filling portion.
Take the mold in both hands and shake it back and forth, side to side, and rotate it vigorously about its center in a back-and-forth motion to shake the mix down into all of the detail. The aggregate will tend to float allowing the more liquid cement to fill the mold detail.
Add more concrete into the mold until it is about half full and repeat the vigorous shaking motions.
Put the mold down onto the flat surface that has been prepared and tap the mold lightly on all sides to dislodge any air bubbles. An easy way to do this is to lift one edge about 1/2” and drop it then lift another edge and drop it.
Keep drop-tapping the mold or tapping it lightly with a rubber hammer, mallet or small board until the air bubbles have worked their way to the surface.
Add concrete slowly until the mold is filled to within about 1/8” of the top surface. Drop-tap the mold or tap the mold or work surface that the mold is placed on until air bubbles have reached the top surface.
Keep tapping the mold until the top surface levels.
If you are planning on making many stepping/paver stones and will be pouring and filling a lot of molds you might want to make a back-saving work board.
It is an easy tool to make, works extremely well for agitating the poured mold, and saves a lot of strain on your arms and back muscles.
See how to fill the mold.
CURING THE STEPPING STONE IN THE MOLD
Curing the concrete stepping stone is a matter of leaving the mold undisturbed for 36–48 hours. Finely detailed stepping stone molds should be left to cure longer, so that when you go to remove the mold from the cured stone the finer bits do not remain behind in the mold.
The temperature during the curing phase should not fall below freezing or exceed 85–90 degrees F.
Concrete curing slows significantly as the temperature drops. If the temperature is expected to drop below 40 degrees F, you might want to wait until the weather moderates, or put them in a location with controlled temperature such as a garage, shop, barn, or similar.
It is advisable to wet the concrete surface with a light mist of water periodically during the initial curing process.
One technique that is helpful to optimize the curing process is to cover the surface with a damp cloth and re-dampen the cloth periodically. This helps slow the evaporation of moisture and promotes more complete hydration of the concrete.
Your stepping stones should not be set into place or walked on for at least 7 days from the time you pour them. Concrete reaches about 80% of its strength in 7 days, and achieves about 99% of its strength in 28 days. Try to avoid walking on detailed stones for at least 7 days.
REMOVING THE STEPPING STONE MOLD
Once the concrete has completed its initial cure, turn the filled mold over, taking care to hold the stone from the underside as it is inverted. Place it on the surface used to allow it to cure and lift the mold by the border lip. The mold should lift off easily.
If the mold does not slip right off, press down lightly in the center of the mold while gently lifting each edge lip slightly, and the mold will release and slip off.
CLEANING THE STEPPING STONE MOLD
It is extremely important to clean the mold thoroughly after use.
Although the mold release will keep the concrete from sticking to the mold, there will be some concrete residue left behind.
Rinse the mold with warm water and mild detergent, rubbing out any concrete residue with a sponge, paper towel, or your fingers.
Do NOT use abrasive cleaners, solvent-based cleaners, or scouring pads.
Dry the interior surface of the mold with a paper towel.
Once the mold has been cleaned and dried, either store it out of direct sunlight (to protect for future use), or reapply a thin film of Vaseline® and form another perfect stepping stone.
CREATING A STEPPING STONE AREA OR PATH
Once you have created enough stepping stones to complete your project area or path, dig down approximately 2-1/2 inches and level the area.
Backfill the area with at least 1/2 inch of sand and re-level carefully. Wet the sand down with a fine mist hose spray nozzle and re-level.
Place the stepping stones in position, butting them against each other so they touch at their base. Check each stone with the carpenter's level.
Once you are satisfied with the position you can lock the stones into position by one of several methods. You can sprinkle earth or sand in between the stones, or you can mix bricklayer's mortar mix and pack mortar or grout down between the stones.
If you use mortar or grout, allow time (i.e., at least 24 hours) for it to cure before subjecting the area to traffic. If you use just sand or earth wet it down and refill any areas that sink. If you are only setting individual stones, you can simply fill earth back against the stone sides and tamp firmly.
